Friday, July 6, 2018
Course evaluations for Friday
For easy access:
Here is the course evaluation for this class.
And here is the link to the reflection on the GRADING in this class.
Wednesday, July 4, 2018
Presentation Schedule for This Week
Here is a template of the Feedback Form we will use for each presentation. This is NOT EVALUATIVE and is designed to offer some feedback to help advance your thinking.
THURSDAY, JULY 5
11-11:15 Check in after weekend
11:15-11:50 Practice with a partner
11:50-12:00 Schedule for the day
12:50-1:05 BREAK
2-2:15 BREAK
3:05-3:20 BREAK
3:20-4:00 Debrief the all day schedule and Reflect on presentations
FRIDAY, JULY 6
11-11:35 Course Evalution #1
12:35-12:55 BREAK
1:30-1:45 BREAK
2:15 Grading Policy Discussion
Tuesday, July 3, 2018
Some Pecha Kucha Resources
Several of you are asking about how to set your Pecha Kucha to 20 seconds in Google Slides.
Once you create your presentation in Google Slides, you will need to PUBLISH IT TO THE WEB and set the auto advance timer to 20 seconds.
- On the home page of your slide show, click "file"
- On the drop down menu, click "publish to the web"
- On the pop up, click "start slideshow as soon as the player loads" (don't worry about the timer yet....)
- Copy and paste the SHAREABLE LINK into another place (I would put it in my blog or even a word doc for safe keeping)
- The last part of the link should be a number (the default is 3000, meaning 3 seconds). Change that to "20000", meaning 20 seconds
Some other links that you may find helpful
What is Pecha Kucha?
Why Use Pecha Kucha?
A PK on PK
Using Google Slides for PK
5 Tips on PK
Wednesday, June 27, 2018


Saturday, June 23, 2018
Welcome to Digital Media Literacy!
Welcome to CURR 550: Digital Media Literacy!
Today in class, you will set up your own blog to use this week and next for all of your written assignments, and to keep track of your thoughts about any of the issues we cover. You can also maintain this blog after this class is over for personal or professional purposes.
 A blog is your very own, personal online journal. It is public, in that I and your classmates can read it and comment on it, but it is your space and you can control most everything about it. (If you want to make it private so that *only* members of this class can read it, click here for instructions).
In the context of this course, your blog has two purposes:
1) Your blog will provide a space for you to keep all of your writing assignments over the course of our seven days together. You will not hand in any written assignments; rather you will post them on your blog. In this sense, your blog is merely your assignment notebook that you will use as you read and prepare for class each day. You will also be posting any additional thoughts you have: responses to class discussion, after thoughts, things you forgot to say in class or want to remember for future use, relevant experiences you have, etc. But importantly, your blog is a public space, and as you post (and comment on others'), you will gain a much richer understanding of everything we read and discuss in class. I want you to think of it as interactive and intertextual in that way. In this sense, your blog is much more than just a Microsoft Word document that happens to be online. It is a hypertextual space that allows you to link to images, webpages, video and other online tools and toys.
2) Creating your own blog will also introduce you to the blogisphere if you don't know this place already. Why blog? I am trying to encourage you to practice the digital literacies we are learning about. Further, I think you will enjoy it, and I hope that you will discover creative educational uses for this online medium. You will see how easy it is to use blogger.com, and perhaps it will inspire you to be a blogger in other areas of your life.
To start your own blog, you will go to: www.blogger.com
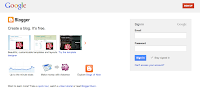 If you do not already have a Google account, you will need to create one. If you do have a Google account, sign in in the box at the right. This will allow you to create your own blog on a site called blogger.com.
Click the button that says NEW BLOG (you will see this even if you have blogged before) and follow the instructions to get started.
Don't forget your Username and Password!! You will need them to login every time. Please write them down on the top of your syllabus so you don't forget!
As you fill in the info, you will be asked to give your blog a TITLE. This title will appear at the top of your blog. (Mine is called "Digital Media Literacy 2018")
Then, you need to choose an address: http://_______.blogspot.com. This will be the web address associated with your site. You can call it anything you like. Be clever or simple (or both) -- it is up to you. Do note that many addresses have already been used by other bloggers, so you may have to get creative. Write it down so you don't forget it! (You can also find it later on in your Dashboard where all of your future blogs will be listed.)
You will also need to choose a design template for your blog. I HIGHLY RECOMMEND STARTING WITH SIMPLE OR PICTURE WINDOW for ease and readability. Look through the options listed and see what appeals to you. You can change this later so don't worry too much about it initially... Once you have the account set up, you can start posting.
A “post” is an entry on your blog. (For clarification, you have one blog, but many posts). Give the post a title and then compose as you would any journal entry. When you are finished, hit the button at the bottom that says Publish. It will not appear on your blog until you publish it. You can always go back and edit old posts and create new ones.
Your First Po
 Your first post should be a short introduction to you: who are you, how your summer is going so far, what do you do when you are not in class, etc. (Just a short paragraph — no big deal). Try to include one picture in this post. You will post the rest of the entries as they are due (see syllabus for dates), or whenever you have something to say!
When you are done creating your site and posting your first entry, please come back to this blog and post a comment at the end of my first posting (scroll down) that includes your name and blog address so that I can post it in the link list to the right. For the rest of your time this morning, I want you to return to your blog, put up a second post and play with your blog a bit...
 Do you think of yourself as a digital native? If not, what kind of “immigrant” are you? Include 5 links and a youtube video in your post. If you can't figure out how to do this, click on the links above, google it for other advice, or ask me and I can help.
Some Tips and Helpful Hints:
LB :)
Today in class, you will set up your own blog to use this week and next for all of your written assignments, and to keep track of your thoughts about any of the issues we cover. You can also maintain this blog after this class is over for personal or professional purposes.

In the context of this course, your blog has two purposes:
1) Your blog will provide a space for you to keep all of your writing assignments over the course of our seven days together. You will not hand in any written assignments; rather you will post them on your blog. In this sense, your blog is merely your assignment notebook that you will use as you read and prepare for class each day. You will also be posting any additional thoughts you have: responses to class discussion, after thoughts, things you forgot to say in class or want to remember for future use, relevant experiences you have, etc. But importantly, your blog is a public space, and as you post (and comment on others'), you will gain a much richer understanding of everything we read and discuss in class. I want you to think of it as interactive and intertextual in that way. In this sense, your blog is much more than just a Microsoft Word document that happens to be online. It is a hypertextual space that allows you to link to images, webpages, video and other online tools and toys.
2) Creating your own blog will also introduce you to the blogisphere if you don't know this place already. Why blog? I am trying to encourage you to practice the digital literacies we are learning about. Further, I think you will enjoy it, and I hope that you will discover creative educational uses for this online medium. You will see how easy it is to use blogger.com, and perhaps it will inspire you to be a blogger in other areas of your life.
To start your own blog, you will go to: www.blogger.com

Click the button that says NEW BLOG (you will see this even if you have blogged before) and follow the instructions to get started.
Don't forget your Username and Password!! You will need them to login every time. Please write them down on the top of your syllabus so you don't forget!
As you fill in the info, you will be asked to give your blog a TITLE. This title will appear at the top of your blog. (Mine is called "Digital Media Literacy 2018")
Then, you need to choose an address: http://_______.blogspot.com. This will be the web address associated with your site. You can call it anything you like. Be clever or simple (or both) -- it is up to you. Do note that many addresses have already been used by other bloggers, so you may have to get creative. Write it down so you don't forget it! (You can also find it later on in your Dashboard where all of your future blogs will be listed.)
You will also need to choose a design template for your blog. I HIGHLY RECOMMEND STARTING WITH SIMPLE OR PICTURE WINDOW for ease and readability. Look through the options listed and see what appeals to you. You can change this later so don't worry too much about it initially... Once you have the account set up, you can start posting.
A “post” is an entry on your blog. (For clarification, you have one blog, but many posts). Give the post a title and then compose as you would any journal entry. When you are finished, hit the button at the bottom that says Publish. It will not appear on your blog until you publish it. You can always go back and edit old posts and create new ones.
Your First Po
When you are done creating your site and posting your first entry, please come back to this blog and post a comment at the end of my first posting (scroll down) that includes your name and blog address so that I can post it in the link list to the right. For the rest of your time this morning, I want you to return to your blog, put up a second post and play with your blog a bit...
Your Second Post

Some Tips and Helpful Hints:
- Once you are in your blog, look at the top right corner of the screen. If you click on the word DESIGN, you will be able to make design changes, create new posts, edit old posts, etc. (You can only do this if you are logged in to your blog.)
- Once you are in the DESIGN screen, you can do all kinds of things to make your blog a bit more interesting. Change your fonts and colors, edit a post, change your settings. See the tabs at the top of the screen for all kinds of options.
- Poke around online and make a list of websites related to education, media literacy, social justice or anything else relevant and post them on your blog. You can add all kinds of things by ADDING A GADGET from your LAYOUT screen.
- Just do the best you can with this. If you get stuck, don't fret... I am happy to help you anytime as you work on getting this started. And remember: you can't break it. It is just a blog. Everything can be changed if need be!
LB :)
Subscribe to:
Posts (Atom)